Repairing the VAZ 2110 engine, like any other model of the car, is not an easy job, but still performed. If you are at least a little versed in the technique, then you will be able to perform it. To carry out repairs, you must at least disassemble the engine. We bring to your attention a hint on how and in what sequence to carry out such work.
Detailed instructions for disassembling and repairing the VAZ 2110 engine:
1. Remove the "engine" from the car.
2. Remove the clutch from the engine.
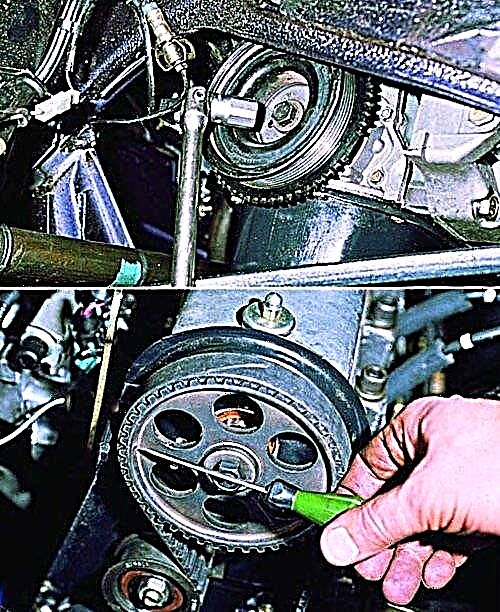
3. Remove the idler pulley, camshaft drive belt and spacer washer that is installed under the idler pulley.
4. Remove the toothed pulley from the camshaft.

5. We unscrew four bolts, three of which are attached to the water pump. We unscrew the fastening nut on the rear cover of the camshaft drive belt and remove the cover.
6. To remove the water pump, insert a screwdriver between the block and the pump casing flange and thus slide it out of its seat. After completing these operations, we remove the water pump.
7. Remove the head from the cylinder block.

8. Unscrew the bolts (there are 16 of them) securing the oil sump, then remove it together with the gasket.
9. Unscrew the bolts (3 of them) fastening the oil receiver and remove it. Note that there are spring washers under the bolt heads.

10. Unscrew the bolt in the oil sump that holds the oil level sensor. Remember that there is a spring washer under the bolt head. We take out the sensor from the cylinder block; if necessary, you can turn the crankshaft so that its counterweight does not interfere with the removal of the sensor. 11. Then rotate the crankshaft so that the piston that is being removed hits the BDC (bottom dead center). It is necessary to unscrew the two fastening nuts to remove the connecting rod cover.

12. Now remove the connecting rod cover. In the case when it is difficult to dismantle the cover, you can first touch it with light hammer blows. It may be that the number of the cylinder on the cover will be invisible, in which case the cover should be marked with the number of the cylinder.
13. Using the hammer handle, push the connecting rod into the cylinder, then carefully remove the piston with the connecting rod from the cylinder. In the process, you need to ensure that the lower head of the connecting rod does not touch the cylinder mirror, as this can damage it. Remove the rest of the pistons in the same way.
14. If it is necessary to remove the piston from the connecting rod, then we mark it with the cylinder number so as not to confuse them during installation. On the connecting rod, the same must be the cylinder number: if it is not visible, then we mark the connecting rod.
15. We carry out the removal of the flywheel.

16. Unscrew the bolts (there are 6 of them), remove the crankshaft rear oil seal holder and the gasket. Remember that there are spring washers under the bolt heads.
17. From the crankshaft, remove the toothed pulley. In the case when the key does not sit tightly in the groove of the shaft elbows, be sure to take it out so that it does not get lost.

18. Unscrew the six bolts, under the heads of which there are spring washers, and remove the oil pump and gasket.
19. We unscrew the fastening bolts on five caps (each with 2 bolts) of the main bearings.

20. Remove the covers.
21. Remove the crankshaft of the VAZ 2110 car.

22. We carry out the removal on the middle support of the persistent half rings of the crankshaft.
23. If it is not planned to replace the liners, then as they are removed, we take them out of the block beds and from the main bearing caps.

24. On the non-working side, we mark the inserts relative to the beds and covers.
25. If there is a need to remove the engine mounts and generator brackets, unscrew the bolts (3 pieces) of their fastening and remove the supply pipe of the water pump by unscrewing its fastening.

26. Remove the piston rings using a special puller. If there is no such device, then remove the rings from the piston, carefully opening the ring locks.
27. Remove the oil scraper ring expander spring from the engine piston.

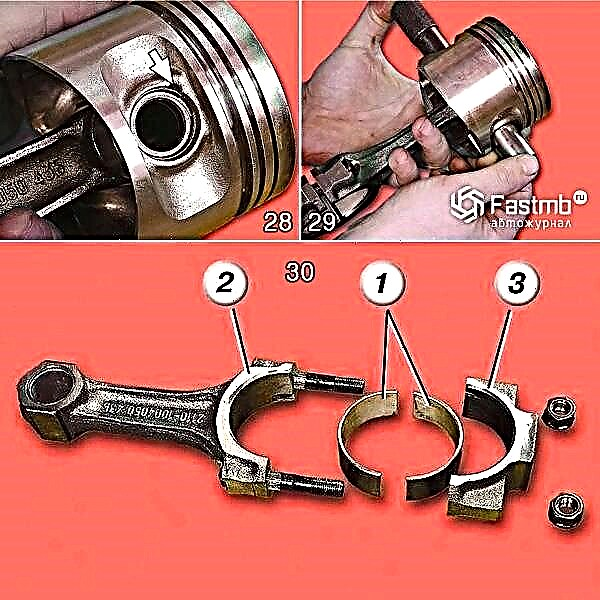
28. The retaining rings that hold the piston pin are removed from both sides of the piston. Recesses are provided in the piston bosses for easy removal of the rings.
29. Using a suitable mandrel, push the pin out of the piston, then remove the piston from the connecting rod.
30. Take out the inserts from the connecting rod and its cover. If they remain on the crankshaft, remove them from the shaft. If the replacement of the liners is not required, then as they are removed, we mark them with respect to the numbers of caps and connecting rods.
This completes the process of disassembling the VAZ 2110 engine. Successful completion of the renovation.
WHA